Collect Training Data Using Amazon SageMaker Ground Truth & Figure Eight

Training data, a.k.a ground truth data, including both observations and the corresponding outcomes, is the prerequisite for building supervised machine learning models. The quality and quantity of the training data often has a great impact on the resulting models, whereas it is not always easy to obtain large-scale and high-quality training data as it sometimes requires humans to annotate the outcome or label of each data record manually. Things become even harder when the labeling task is not as straightforward as distinguishing dogs from cats.
Enigma has been working on entity resolution using machine learning models. We used to collect the training data for the models by kicking off labeling tasks internally. We did it this way because the data used for general entity resolution problems may not fit our product needs, and people who label the data at Enigma usually have the best domain knowledge of the entities we’re resolving. However, the labeling process costs a lot of time and human effort, and is hard to scale. We recently decided to try out some labeling platforms such as Amazon SageMaker Ground Truth and Figure Eight to help us scale our collection efforts. This post introduces how these platforms work, and also describes the preparation and post-processing we have done to complete the training data collection using these platforms, as well as some tips and takeaways. By the end of this post, you will be able to know—
- Which platform is right for you
- How to create a successful labeling job
Overview of labeling platforms
The two labeling platforms we work with are Amazon SageMaker Ground Truth and Figure Eight. They both allow users to upload unlabeled datasets to the platform along with the instructions of how the data is expected to be labeled, and then the platform will launch the labeling job to let the human labelers in their distributed platform to complete the job. Users can determine the number of times each dataset should be labeled (with different prices). For example, if the number is 3, it means each single record in the dataset will be labeled by 3 different labelers. Both platforms can complete human labeling tasks really fast: a job of 10,000 records with 3~5 labelers per each record can be done within one day. In addition, both the two platforms can also apply built-in models to label the data automatically, reducing the labeling time and the costs of human labelers. Despite the common functionalities, the two platforms have their own characteristics and customizability in terms of the user interface, input and output, workflows, human labeling, automatic labeling and pricing.
Amazon SageMaker Ground Truth (ASGT)
User Interface: Users can manage the labeling jobs within AWS console as well as other Amazon SageMaker features like training jobs, which means the created training datasets can be easily imported into SageMaker for use in model development and training. Users can monitor the labeling progress in real-time from either the console or the output folder on S3.
Input & output: The input and output of the labeling job must be stored in specified JSON format on S3. It looks like only text and image input data are supported for now. The output folder stores both the raw annotations of labelers and the aggregated annotations.
Built-in workflows: There are four built-in labeling workflows on ASGT: object detection, image classification, text classification, and semantic segmentation. Each workflow has its own labeling tool and annotation consolidation algorithm. Users only need to provide input data in the required format and set up the instructions using the AWS console.
Customized workflow: In addition to the built-in workflows, users can launch a customized labeling workflow by creating the labeling interface and the lambda function for annotation consolidation.
Human labeling & labeler types: There are three types of human labelers: private team, Amazon Mechanical Turk and third-party vendors. The private team only contains labelers within the user’s private organization, e.g., a group of employees at Enigma. Amazon Mechanical Turk refers to public human labelers on Amazon’s workforce network. Third-party vendors are those who specialize in data labeling.
Automatic labeling: ASGT creates a model first based on a small set of labeled data given by the user, and then uses the model to label the input data automatically. The data that the model feels ambiguous will be sent to human labelers and the human-labeled data will then be sent back to the model for active learning.
Pricing: ASGT charges one labeling job at a time, based on the amount of objects that are labeled, the type of workflows and the type of labelers.
Figure Eight (FE)
User Interface: FE has an easy-to-use interface for users to upload input data and download output data and reports. The web portal shows real-time progress as well as advanced analytics and plots. Users can determine specific labelers for private tasks and even monitor the progress and performance of each labeler. The labelers can also provide feedback in regards to labeling tasks to the users.
Input & output: FE accepts .csv, .tsv, .xls, .xlsx and .ods formats through the web portal or the RESTful API. Not only text and image, but also videos and audio are supported. The output data also contains both raw annotations and aggregated annotations. Built-in workflows: FE has built-in templates of many popular tasks such as sentiment analysis, search relevance, data categorization, image annotation, speech recognition, data enrichment and data validation.
Customized workflow: FE allows its users to use its WYSIWYG editor to customize the workflow by creating multiple layers of conditional logic, adding custom JavaScript, sending annotated data to in-house models, and customizing data annotation workflow.
Human labeling & test question: FE has a unique phase at the beginning of the human labeling job: all the labelers participating in the job must first complete the test questions which is a small set of ground truth data given by the user. Only those who passed the questions can be allowed to proceed the labeling task, making sure the labelers understand the task precisely.
Automatic labeling: FE also has a similar ML-assisted labeling workflow combining model labeling and human labeling. Users can choose from multiple pre-trained models for different types of labeling tasks. More interestingly, FE allows users to create multi-job processes through the UI using logic-based routing rules between models and jobs to generate aggregated results.
Pricing: FE charges a company customer a flat rate per year based on the estimated amount of rows labeled. They may offer other pricing options.
Preparation
Before kicking off a labeling job on these platforms, we need to prepare the dataset to be labeled, the instructions and examples for the job, and set up templates if using customized workflow.
Data to be labeled
The data we use to generate the training data is from the real-world public data sources we are trying to link. More specifically, the model we are building for our entity resolution framework is to identify the relationship of two given company entities based on their common identifying attributes. This is the initial training dataset for our model, so we want the training data to be evenly distributed in terms of the difficulty level. We also want to cover as many cases as possible and subsample each case in a well-balanced manner. Therefore, we first randomly generated some pairs of entities (note: in practice we are not comparing arbitrary pairs but only interested in pairs that are likely related, but we also need negative samples to train the model), then sampled multiple subsets based on their pairwise similarities on each identifying attribute, making sure we covered different range of similarities and possible combinations. In the end, we actually generated a couple of datasets with different sizes under the same distribution. We need some small datasets to test out the labeling platforms and we did go through some trials and errors before we know how to create a successful labeling job.
Tips:
- I assume you can get enough data for labeling on these platforms– if you can’t, then it’s probably not necessary to use these platforms.
- Make sure the data you are going to expose to the public labelers does not contain sensitive information.
- Start with small labeling tasks so you can easily refine your instructions and adjust your dataset based on the resulting labels.
- If you are collecting training data to improve and existing model, you may want to oversample the cases in which the model did poorly. For classification specifically, you can oversample the cases around the class boundaries.
Instructions
Because these platforms launch labeling jobs at scale, we need to make sure the labelers understand what we are expecting through the job instructions.
The process of preparing the instructions usually starts with exhausting all the possible cases the dataset might have. By looking at the concrete data during this process, we realized that our original expectation of the problem is unclear. We planned to build a binary classifier to determine whether two companies are the same, but there could be more relationships of two companies we want to capture. We finally changed the labeling task to be a multi-class classification problem, which made the number of classes hard to determine and the instructions more complicated: more classes may make it more difficult to draw the boundaries while fewer classes could result more ambiguous cases. We then refined our problem and instructions several times to retrieve the expected labeling results. (See more details in Experiments.)
Since the labelers will only read the instructions for a short period of time, giving concise instructions becomes essential. ASGT allows the users to provide both short instruction and full instruction. Short instruction highlights the most important rules with simple words, and full instruction supplements short instruction with detailed rules and more complex cases.
Examples are highly recommended to be included in the short instructions because examples are better than words, even though we can provide more examples in ASGT’s full instruction or FE’s “test question” phase.
Tips on labeling examples in general:
- For categorization labeling tasks, each category should have one or two examples.
- The examples should speak for themselves: easy to understand and precisely representative of the cases we want the labelers to deal with.
- The examples should include all the edge cases: these are usually the cases we need help from human intelligence the most.
- Again, keep in mind that labelers only spend limited time on reading the instructions, so the examples should be as concise as possible.
Tips on providing examples on FE:
- With FE, we can provide more examples outside the instructions and we can add comments for each example to further explain why we give a certain label.
- Note that the examples and explanations should be consistent with the instructions.
- For categorization labeling task, make sure each category is sufficiently represented by the test questions and all categories have balanced distributions.
- Keep in mind that the labelers who pass the test questions you generate are supposed to succeed on the larger dataset.
Customized Templates
Our labeling task can apply the built-in data categorization template on FE, but there is no suitable template available on ASGT (the closest one is the text classification template, but the built-in labeling tool can not display our data well), so we have to customize our own workflow on ASGT. There are two parts we need to customize: the HTML interface to display the instructions as well as a pre-processing Lambda function to import the data to the frontend, and the post-processing Lambda function to tell ASGT how to consolidate the annotations.
The HTML interface is easy to customize to display the instructions however we want, and it can import the data values that are defined and parsed from the input JSON file in the pre-processing Lambda function.
Figure 1 shows our pre-processing lambda function template. The input data we provide is in required JSON format for text data, i.e., each line is a complete and valid JSON object where the text data object to be labeled must be the value of source and each source data record must be a text string or a dumped json object.
![]()
Our input data looks like as follows, the data object contains multiple attributes of the entity.
![]()
The lambda function is used to load and parse the data object to the frontend (see line 10–19 in Figure 1) so that the HTML can load the specific items of the data object (see line 10–11 in Figure 2).
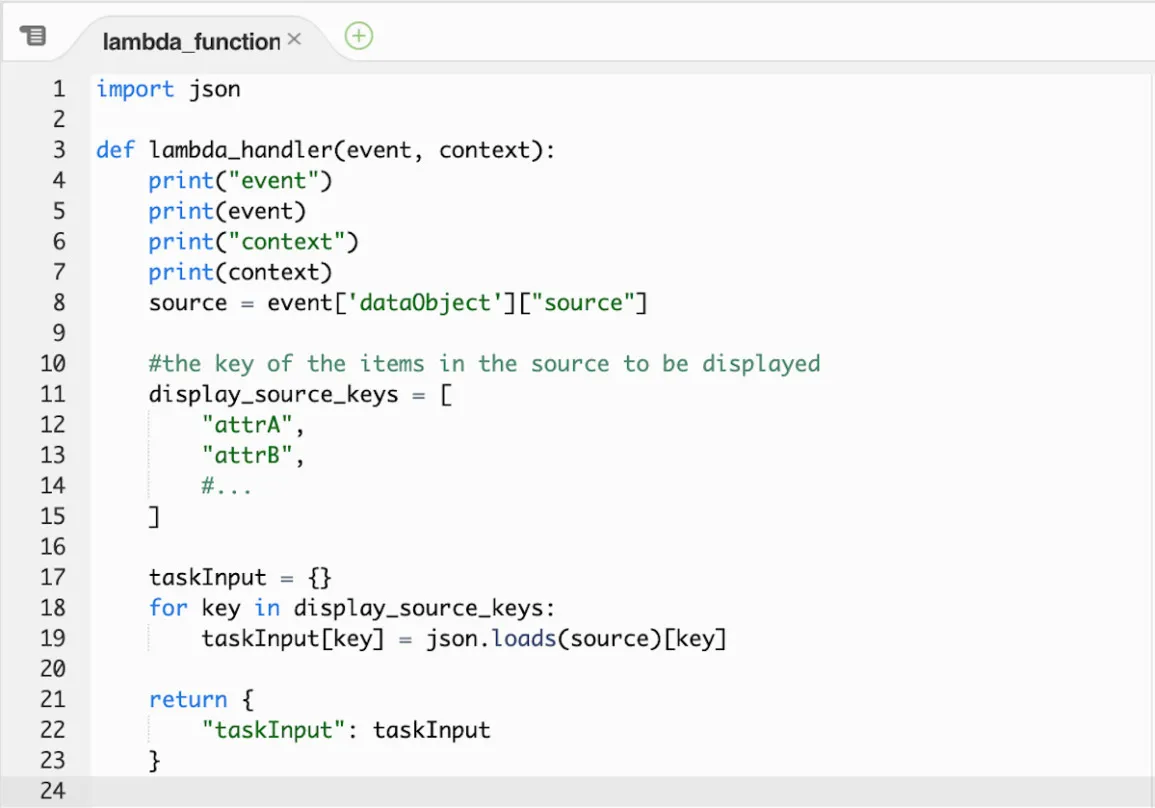
Figure 1. Pre-processing Lambda Function Template
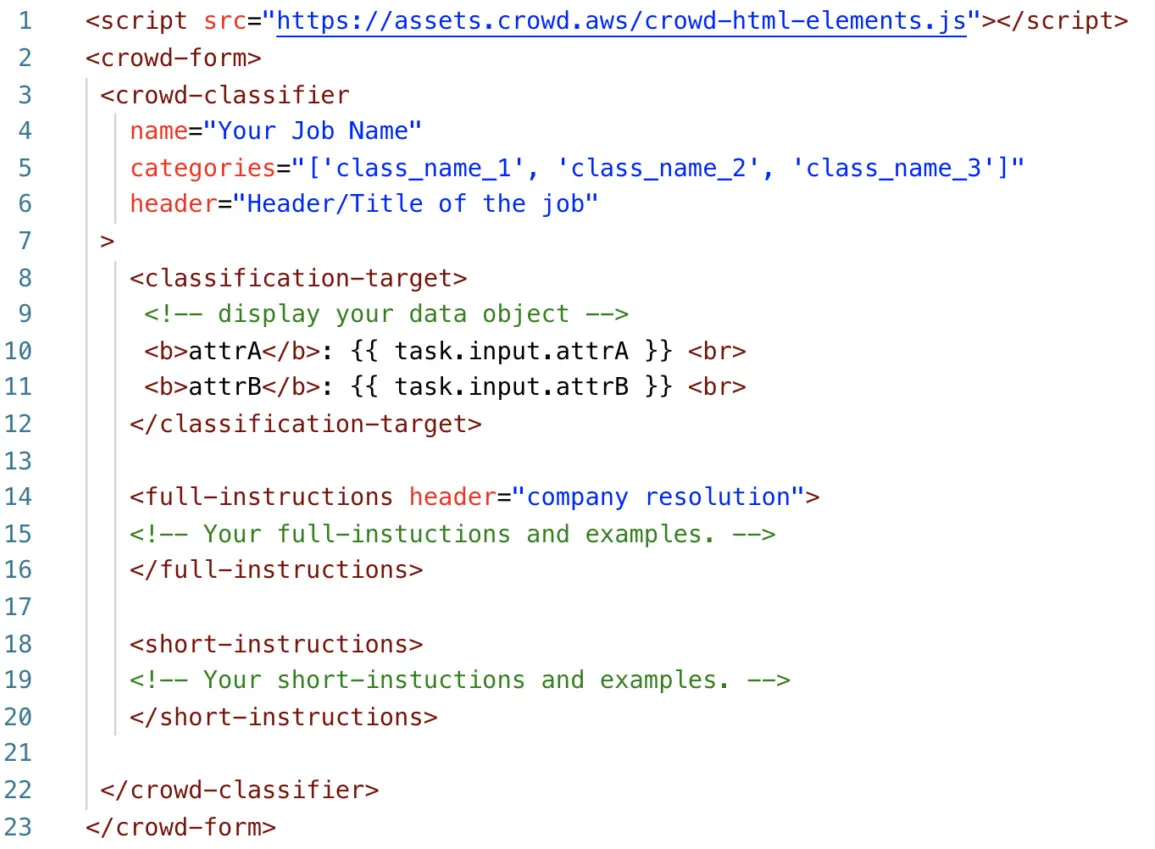
Figure 2. HTML Interface Template
In the post-processing function (Figure 3), we can parse the raw human responses and consolidate them with our own algorithm. We will introduce some common algorithms in the following sections, but here we used the function that is introduced in a Demo Template, which basically integrates all the information available such as the labelers’ IDs and responses for each record into the output file. The benefit of using this function is that it saves full results to the output file during the labeling job and with that we can apply any consolidation functions offline.
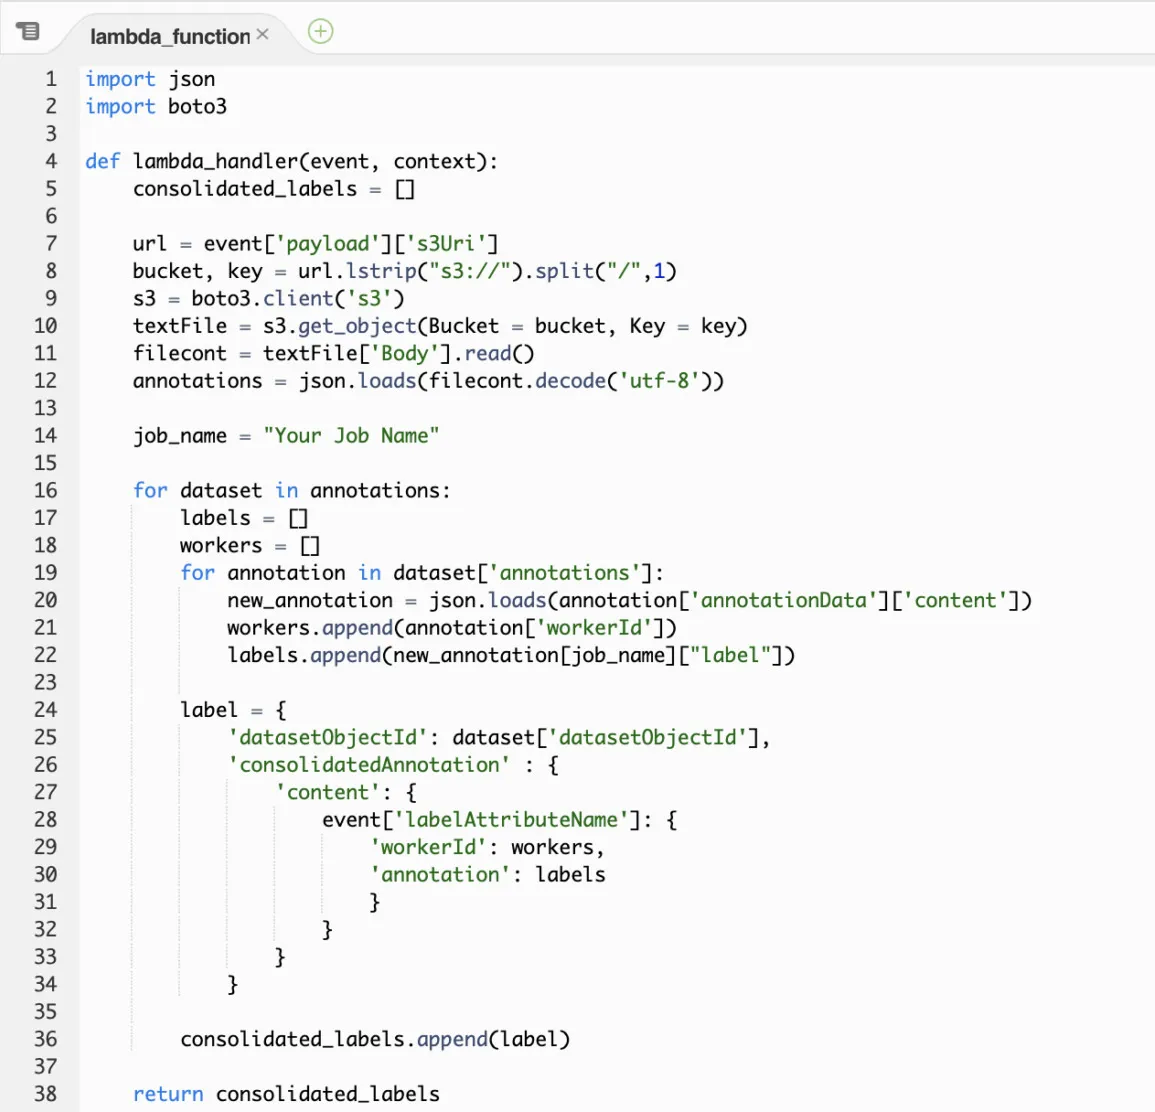
Figure 3. Post-process Lambda Function Template
Post-processing
After the labeling job is complete, we need to verify the quality of the resulting labels before applying them for training. For those labels aggregated by the platforms with the label confidence attached, we can subsample the results by different confidence scores to manually check the labeling accuracy. Usually the ones with high confidence scores are safe to use, while the ones with low confidence scores may need to be double-checked. Note that those controversial data records are worth manually check as they are important to model building.
Since the platforms also provide the full annotations of each labeler, we can post-process the full annotations in the way we want. The most intuitive way is majority voting. There are also some advanced aggregation approaches such as Dawid-Skene algorithm and its variations which take the prior reliability of each labeler into account. AWGT also did some experiments to compare the Majority Voting and Modified Dawid-Skene functions, it turns out that the Modified Dawid-Skene is more robust than Majority Voting in dealing with different number of labelers.
Experiments
We did several labeling experiments using the two platforms with different settings in the following aspects—
- The platform
- The instructions
- THe number of categories for data categorization problem
- The size of the dataset
- THe number of labelers
—to see how the settings of the labeling job will affect the quality of the labeling results.
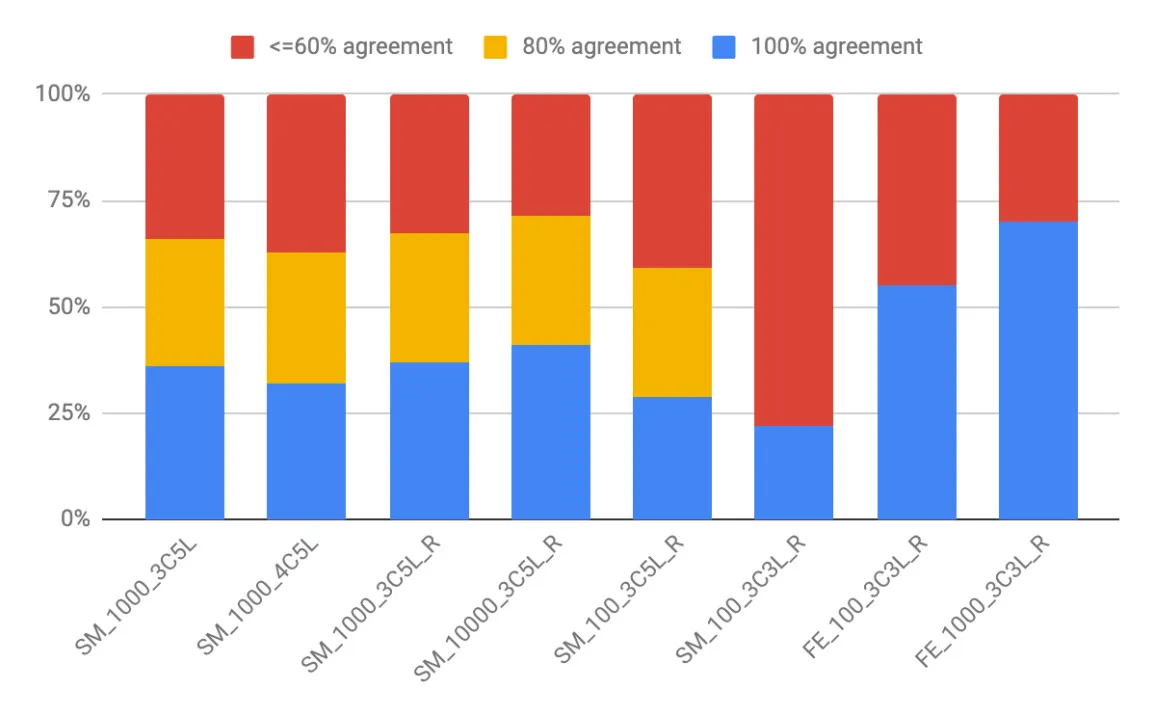
Figure 4. Results of labeling jobs with different settings
Figure 4 shows the results of different labeling jobs. We check the proportion of agreement of labelers on certain dataset. The blue bar in the figure represents the proportion of the data records that got labeled the same by all their labelers, and the yellow one refers to the proportion of the data records that got same labels from 4 labelers out of total 5, while the red one means only 3 (out of total 5) or 2 (out of total 3) labelers agree on the same label for those proportion of data. The name of the labeling job reflects the settings. “SM” refers to the jobs on SageMaker and “FE” are the jobs on FE. The first number in the name represents the size of dataset being labeled. The same number also means the same dataset. The “xCyL” here means that the data has “x” categories to distinguish and “y” labelers per records. The job whose name ends with “R” has refined instructions.
We can learn from the figure that—
• 3-class caused less confusion than 4-class in our problem.
> e.g. SM_1000_3C5L vs. SM_1000_4C5L
• Our refined instructions cleared up some confusion for the labelers.
> e.g. SM_1000_3C5L vs. SM_1000_3C5L_R
• A larger dataset usually has a statistically higher ratio of agreement.
> e.g. SM_1000_3C5L_R vs. SM_10000_3C5L_R vs. SM_100_3C5L_R
> e.g. FE_100_3C3L_R vs. FE_1000_3C3L_R
• 5-labeler does better than 3-labeler on SageMaker.
> e.g. SM_100_3C5L_R vs. SM_100_3C3L_R
• 3-labeler on FE is comparable to 5-labeler on SageMaker probably thanks to the “text questions” feature of FE.
> e.g. SM_100_3C5L_R vs. FE_100_3C3L_R
> e.g. SM_1000_3C5L_R vs. FE_1000_3C3L_R
Takeaways
Which platform is right for you?
You may want to choose Amazon SageMaker Ground Truth if either of the following is true:
- You want to import the data for labeling from other SageMaker or AWS services, or export the labeled data to other SageMaker or AWS services.
- You prefer to pay the price per task
- Your labeling task fits one of the built-in workflows on ASGT perfectly
- You are seeking for specialized human labelers (vendor)
- You trust Amazon better, e.g. their built-in active learning model or annotation consolidation algorithms
You may want to try Figure Eight if either of the following is true:
- You are not familiar with SageMaker or AWS, and prefer easy-to-use UI
- Your data contains audio or videos
- Your task fits one of the built-in workflows on FE perfectly
- You prefer to have the “test question” phase in the workflow
- You prefer to pay the price on a yearly basis
What makes a successful labeling job?
- Well-defined problem
- Well-distributed dataset, depending on the model’s need
- Concise instructions
- Representative examples, plus well-explained examples on FE
- Iterative refinement of all the above based on the analysis of labeling results
- Proper workflow, either perfect-fit built-in workflow or proper-customized workflow